Showing posts with label organization. Show all posts

Wednesday, July 3, 2013

Pinterest Fails

This past week in our bible study we talked a lot about how women are the heart of the home. 
One thing we discussed was how easy it is to let household chores slide. 
With free time this summer I decided to try and get better at this. 
On pinterest, I found some great ideas for daily chore schedules. 
I love to check things off so this seemed right up my ally. 
After combining a few different ones I finally made one that I think will work well for us. 
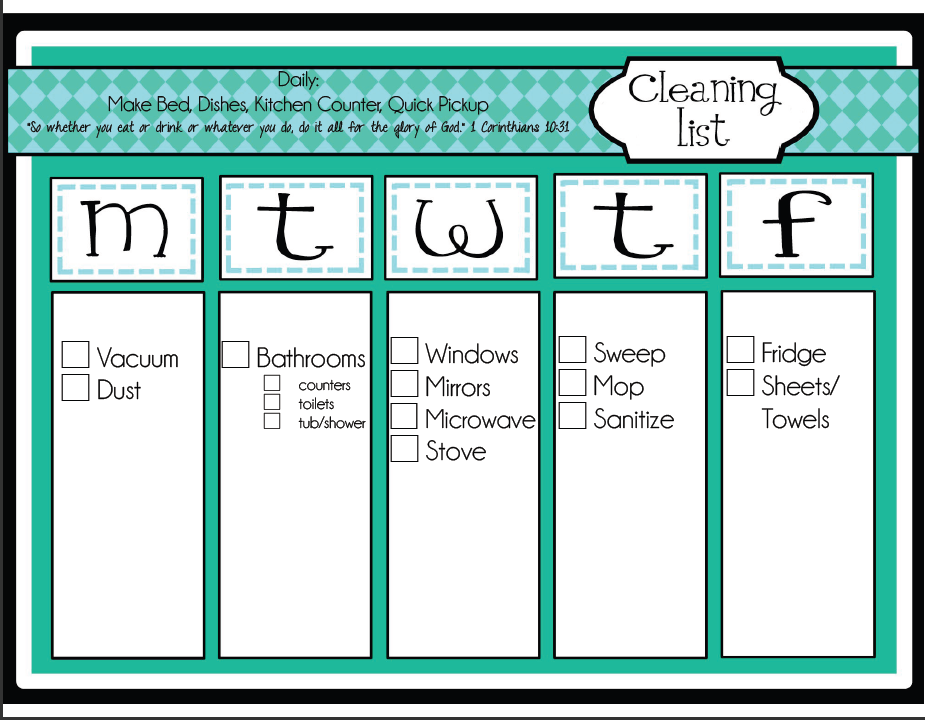
 I found the graphic online, I honestly don't remember where, then added all the words.

So this week I've tried to do a really good deep clean.
Hopefully after this week I'll be able to only need a short time each day. 

I turned to pinterest to find some simple homemade cleaning supplies. 
First, I tried this oven cleaner. 
 Here are the before and after pictures. 
I followed the directions and then ended up scrubbing and scrubbing and there's still only a small difference!
Anyone have a better homemade cleaner?

Then, I tired this idea for the microwave. 
It didn't need to much of a cleaning, but I figured less work is always better.
Nothing "easily" wiped away. I still had to work to clean it out. 

Clearly I'm 0/2 on new pinterest cleaning tips this week. 
At least the house is looking good!


Tuesday, October 9, 2012

Class Job Chart

I told myself I would not have jobs in my classroom.
They're hard to keep up with.
I can never remember who should be doing what.
And more often than not they tend to be more effort than they're worth.

Then I got my class.
All of my students had come from one of four other classrooms.
All of those classrooms had class jobs.
My students wanted to know what their jobs were.
They pushed and shoved and got in trouble because they all wanted to be line leader/door holder.
So I caved.
I made a job list on my white board that I changed daily.
But I had no good way to rotate the students or remember who had done what.
Plus it was taking up half a white board.

Of course I immediately started searching pinterest. 
This is a Class Job Chart that I made for my classroom

I saw this one and decided to make one using the jobs I had already come up with.
Mine is no where near as pretty. I'll probably do more work on it later, but mainly I just wanted it up this week. Plus, I'm sick so I spent maybe 10 minutes on it....

It's hard to see in the picture. 
On the bottom right it says extras and holds all the names that don't have jobs yet. Their sticks will travel around clockwise, changing each Monday.

Jobs in order:
Substitute- Takes over if someone is absent
Table Washers- Cleans lunch tables
Morning Meeting- Does Calendar and Money Mob
Line Leader
Door Holder
Electrician- Turns out lights.
Teacher Helper- Opens door when someone knocks, runs notes, passes papers out, and anything else I need.

I also have their pictures cut out in circles that will be glued to the sticks so it's easy to see from farther away.

Linking up with Melissa, Amber, and Sarah


Tuesday, September 11, 2012

DIY Paint Chip Calendar

If you spend any time on Pinterest, I'm sure you've seen some version of the Paint Chip Calendar.
I have been wanting to make one of these for awhile now, but never got around to it. 
There is a small wall in our office that I thought it would be perfect for. 
The best part about this project is that it's super cheap, mainly because you steal get most of it for free!
Photobucket

The first thing you need to do is go to your local paint place, I went to Walmart, decide what colors you'll be using. I chose to use a mix of colors, mainly because I couldn't decide between blues and greens. You need 35 squares for the dates so make sure you get enough samples. I was able to get two squares out of each sample, so I only needed two of each 12 colors. Now put them in your purse and slowly walk away.

I purchased one of the black plastic frames from Walmart that are $4. Mine was 12x16 because I chose to use 2x2 squares. Feel free to make your squares whatever size works best for you. I like lots of room to write.

Photobucket

Lay out your paint chips in the pattern that you want them to be in. I played around with mine till I had what I wanted. Now start cutting if needed. I cut my squares to 2x2, I didn't have a paper cutter so mine is definitely not perfect.

Photobucket 
Once you have them all cut out start gluing. I used Elmer's stick glue and it worked just fine.
You can either cut a piece of paper to fit your frame, or do what I did and flip the insert over.
I started at the bottom and measured it out so I have even spacing between all the squares. I worked my way up from there.
Photobucket
Once I had all the squares glued down, I measured how much space I had left on top for my days and month. I was left with ~1.5 inches.
I cut out seven 2x.5 rectangles for the days of the week and then cut out little triangles on each side to make it more decorative. I wrote the days on with sharpie and glued them above the squares.
Finally, I cut out another rectangle for the Month. I used the length of the paint chip and made it 1 inch high. I then cut out triangles from both ends. 

Photobucket 
I put it in the frame and then started adding information! I wrote the dates and month in sharpie so I wouldn't keep wiping it off as I wrote.

 *Tip: You can get sharpie off of things that use dry erase markers by fully covering the sharpie with a dry erase marker and wiping off like normal.  


Linking up with Melissa, Amber, and Sarah


Tuesday, August 21, 2012

Organization: Pinterest Style

Since we moved I'm taking the opportunity to put to use some of those great organizational ideas I'm always pinning! Here's what I've done so far!

Turn all of your hangers backwards in January. Whenever you wear something hang it back up with the hanger the right way. At the end of the year, anything that hasn't been turned around should be gotten rid of! 

I had been wanting to do this, but spending the time to switch all of my hangers when I knew we were going to be moving didn't sound like fun. When I hung all my clothes back up I decided to give it a try. In January I'm planning on going through it.

Hang a tension rod under your sink and hang spray bottle by nozzle. 

This is seriously genius!  One: It clears up the space under my sink. Two: I don't have to search through my bottles for the correct one. It's right there! Three: The rod is only $4. Go do this!

PhotobucketPhotobucket
Hang scarfs by shower rods on hanger.

Love this! All my scarfs are in one place and I can easily slip them off of the ring without undoing anything. Only annoyance is that they tend to slid to one side or another. Clearly I need to buy more scarfs to remedy this issue!

Next on my list, shoe hangers and a dry erase calendar!
Photobucket
Linking up with Melissa, Amber, and Sarah!
 
Related Posts Plugin for WordPress, Blogger...